

Long hours come with the job. What grinds architects down is the tedious daily work, the kind that makes you wonder what you did to deserve it, and tagging is one of the quietest examples.
Everyone who works in Revit knows Tag All, and it does what the name says. Ask it to tag the walls on a busy plan and it tags every untagged wall in the view. Then you spend the next hour zooming into corners, deleting stray tags and untangling duplicates so the sheet doesn't look chaotic. You saved five minutes of clicking and added an hour of cleanup, often at 11pm before a submission.
What Tag All does (and doesn't)
The command's full name is Tag All Not Tagged, and Autodesk documents it on the Tag All Not Tagged help page. The steps are:
- Load the tag families you need. Tag All can only place tags and symbols that are already loaded in the project.
- Open the view. To limit the scope, select the elements you want tagged first.
- On the Annotate tab, in the Tag panel, click Tag All.
- In the Tag All Not Tagged dialog, choose whether to tag all visible untagged objects in the current view or only the ones you selected. There is also an option to include elements in linked files.
- Pick one or more tag categories. Selecting wall tags and door tags together tags both categories in one pass.
- If you want leaders, turn them on and set a default leader length. Then set the tag orientation to horizontal or vertical.
- Click OK.
If a tag category is hidden in the view, Revit shows a message and offers to turn its visibility on before tagging. If the view template is what hides it, you need to change the visibility settings or the template first.
Tag All places one tag on each untagged element, at the tag family's default position. It makes no judgment about whether that tag helps the drawing. For walls this matters most, because every wall segment is its own element. A long corridor wall modeled in several pieces gets several tags showing the same type mark. The "Not Tagged" part also only looks at the current view, so the command has no idea what the same walls already carry on an enlarged plan or another sheet.
Native workarounds
Experienced Revit users have a few ways to keep Tag All under control:
- Preselect before you run it. Window-select the part of the plan you care about, use Filter to keep only walls, then choose the selected-objects option in the dialog.
- Run one category at a time. Tag walls in one pass and doors in another, and check each pass before starting the next.
- Tag the important walls by hand. Tag by Category sits in the same Tag panel. On busy plans, many teams tag the exterior walls and one instance of each partition type, and skip the rest. Placing takes longer, and there is far less to clean.
- Settle the tag family and leader settings before you tag, so the defaults Tag All uses are the ones you want.
- Select tags in bulk for cleanup. Right-click a wall tag and use Select All Instances, Visible in View to grab every tag of that type in the view, then adjust or delete from there.
Each of these cuts the cleanup down. None of them tells you which tags are duplicates.
Finding and removing duplicate tags
Duplicate tags in Revit come in two kinds. One is two tags on the same element in the same view, which usually happens when someone tags by hand after Tag All already ran, or when annotation gets copied between views. The other is a run of tags along one continuous wall, each attached to a different segment and each saying the same thing. Revit treats both as valid, so neither triggers a warning.
The manual way to find them is a visual sweep. You zoom in section by section, look for tags stacked on each other or repeated along a run, and delete by eye. On a large plan that is slow, and it is easy to delete the one tag you meant to keep. Some offices write Dynamo scripts or use add-ins to report tags per element, which helps if someone maintains them.
In Frank we wanted the duplicates caught before anything touched the sheet.
Propose-then-approve tagging
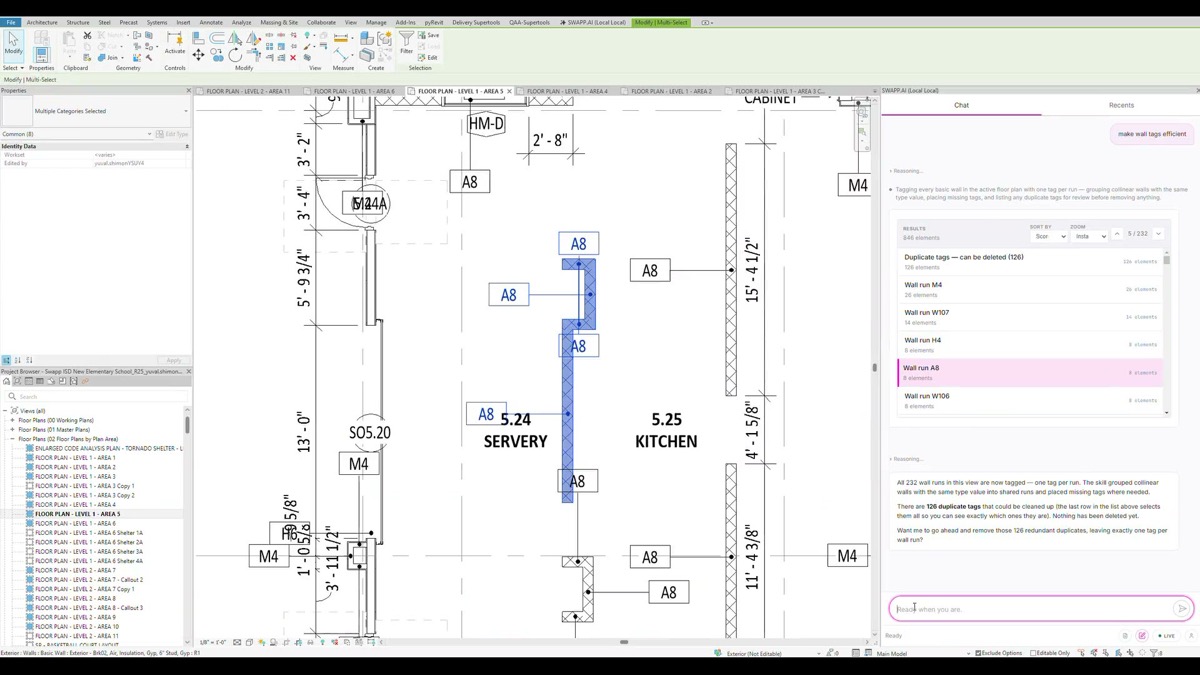
With Frank, our AI Architect for Revit, you ask in plain language: "tag the walls." Frank proposes, you approve. Frank reads the view, works out how many tags it would place, flags the duplicates, and offers to clear out the noise. Nothing lands on the sheet until you say yes.
In one demo on a sample school project, Frank found 232 wall runs on a single view and flagged 126 potential duplicate tags, then offered to remove the ones that did not need to be there, before any of them reached the sheet.
Tagging in Frank is split into a few skills, depending on the scope you need:
- Auto-tag untagged elements on a sheet fills in missing tags for one category at a time in the current view. It is the per-view way to close gaps.
- Tag elements across sheets walks every sheet in the project and tags the untagged elements across the configured categories (walls, doors, rooms, windows, ceilings, furniture and equipment) in a single run. It skips legends and schedules.
- Center room tags moves existing room tags to the visual center of each room, including L, T and U-shaped rooms, so the tag stays inside the space and clear of the walls.
These sit alongside the rest of Frank's documentation skills. If you are new to the idea of an assistant working inside the model, we wrote about it in Revit Co-Pilot: What It Is and Why the Future of BIM Needs One.
We chose the propose-then-approve pattern on purpose. Tagging looks low risk, but a tool that deletes annotation on its own can remove something a teammate placed deliberately. A proposal you can review keeps the architect in charge of the drawing.
Why tag density reflects on the firm
Tagging is a small task, but tag density is one of the first things a reader of the sheet notices.
A clean, consistent sheet tells the reader that someone paid attention: every wall that needs a tag has one, each tag sits where it should, and nothing repeats. Too many tags send the opposite signal: error-prone work, elements hidden under annotation, and disorder in the drawing that a reader may assume extends to the design. A messy drawing reflects on you as an architect, fairly or not.
That is why we treat tag density as part of drawing quality and keep it inside the same review loop as everything else Frank does. If you want to see Frank tag a plan from your own project and walk through its proposal before anything changes, start with the tag across sheets skill and reach out from there.